A Transport Fever 3 station bottleneck is not automatically a capacity problem. Before extending the station or buying another vehicle, identify where movement actually stops. A growing passenger crowd points toward insufficient line capacity, slow service, or limited waiting space. Vehicles queueing outside the station point toward terminal access, occupation time, or approach conflicts. Slow loading points toward platform length or a specialization mismatch. A vehicle sitting at the platform may simply be following its departure settings.
To choose a targeted fix, open Station Statistics, inspect the affected station in detail, watch one complete arrival and departure, and change only the component responsible for the delay. Extra platforms do not help if vehicles cannot reach them, and extra waiting-hall space does not make trains load faster.
Diagnose the Bottleneck Before Rebuilding
Start with the visible symptom, then confirm it in the management windows. Several different failures can produce what looks like the same crowded station.
| Visible symptom | Check first | Likely area to correct |
|---|---|---|
| Passengers keep accumulating | Utilization, delay, unhappy passengers, and the loaded/unloaded graph | Line rate, vehicle capacity, service speed, or passenger waiting capacity |
| A vehicle waits outside while a terminal is occupied | Primary and alternative terminal assignments | Terminal access and simultaneous use |
| An empty terminal is never selected | Reachability from the terminal decision point | Track, road, or route connection to that terminal |
| A train or tram loads unusually slowly | Platform-length warning and loading-speed breakdown | Platform length |
| Cargo handling is slow | Vehicle, terminal, and warehouse specializations | Matching specialization for the cargo type |
| A vehicle remains at the terminal after handling finishes | Departure mode and additional wait time | Stop configuration |
| The line shows a warning or No Path state | Connection-problem indicators and the Select Terminals dialog | Arrival or departure path |
Open Station Statistics to compare stations rather than judging only from the map. The table exposes each station's problems, number of lines, type, current utilization, delay, and upkeep. Its utilization field represents waiting passengers against total station capacity. Its delay field counts passengers who are unhappy because of delays. These values help locate a passenger station under pressure, but they are not a cargo-storage measurement and do not establish a universal throughput target.
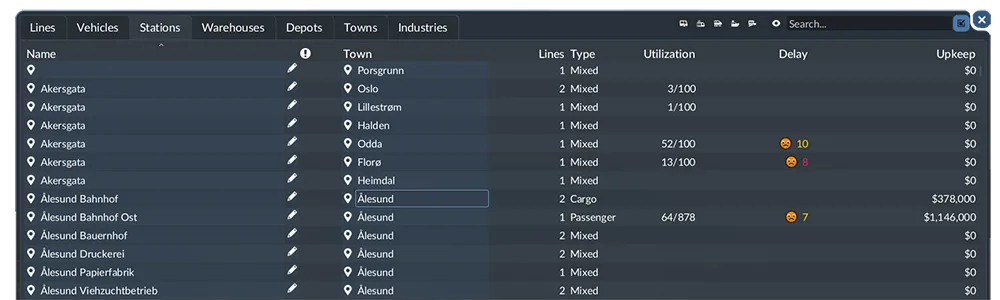
Use the station statistics table to identify utilization and delay problems before rebuilding.
Once you find the affected station, open its Station Details window. Check terminal capacities, combined waiting-hall capacity, terminal specializations, and any warning that a terminal is too short for vehicles serving it. The line overview shows unhappy passengers, while the graph below it shows how many passengers were loaded and unloaded over time. Use those elements together: a crowd alone tells you demand is waiting, while the graph and vehicle movement show whether the service is actually clearing that demand.
Do not begin by adding every available module. First watch at least one vehicle approach, enter, load or unload, and depart. Note whether the longest delay occurs outside the station, at the platform, or after loading has apparently finished. That observation determines which setting or piece of infrastructure deserves attention.
Keep cargo and passenger measurements separate. Passengers wait at platforms or in the station's shared Waiting Hall. Cargo is stored in industries and warehouses. Adding a passenger side building can increase shared passenger capacity, but it is not evidence of more cargo storage, faster cargo handling, or more trains moving through the station.
Make Every Assigned Terminal Reachable
An unused platform is useful only when the line can enter it and continue toward the next stop. Transport Fever 3 assigns terminals automatically according to reachable platforms and their utilization, but you can adjust the assignment with Move Stop and configure alternative terminals for the stop.
Alternative terminals allow an approaching vehicle to use another enabled terminal when the primary terminal is occupied. This can let multiple vehicles on the same line stop at the station at the same time. It is therefore a direct remedy when the bottleneck is a busy primary terminal and the station already has other genuinely reachable terminals.
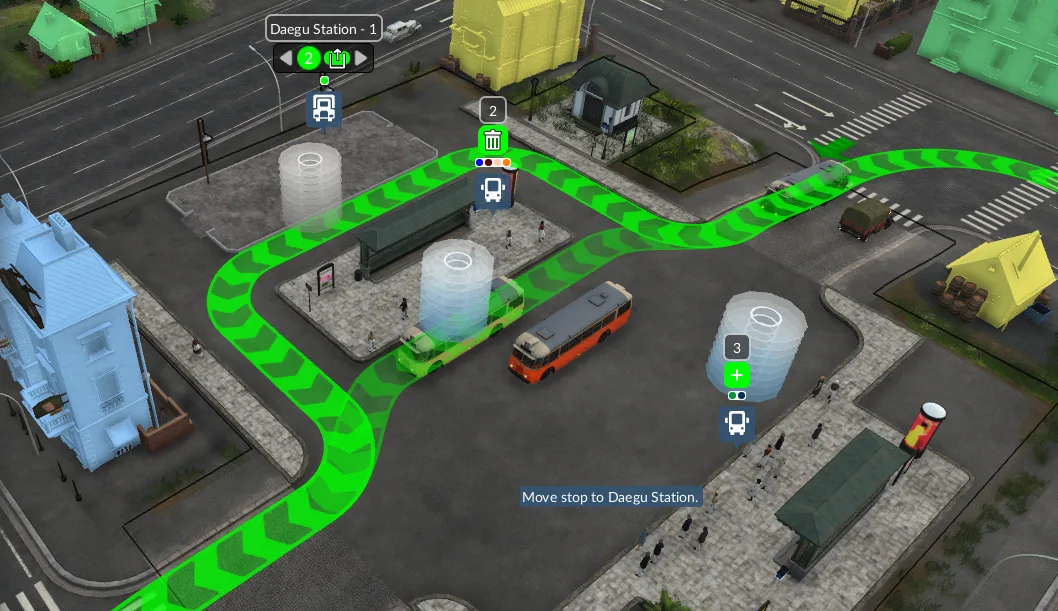
Inspect the numbered bus terminals and their selection controls before changing terminal assignments.
The important condition is the vehicle-specific decision point:
- For trains, the choice is made at the last signal before the station. Every enabled alternative must be reachable from that signal.
- For road vehicles, the choice is made at the station entrance.
- For ships, it is made at the waiting point outside the harbor.
- For aircraft, it is made at the end of the runway.
For a rail station, inspect the last signal marked with the line-colored blinking arrow while the line window or line manager is open. A platform connected somewhere inside the station is not sufficient if a train cannot reach it from that signal. The same principle applies after the stop: the vehicle must also be able to depart toward the next destination.
Use the Select Terminals dialog to identify whether the problem occurs while reaching or departing a terminal. Connection problems appear in the line manager, including a problem notification near the line and red exclamation marks on affected segments. Hover the indicator for more detail. The warning window at the top of the screen can also list line problems caused after changes to tracks or signals.
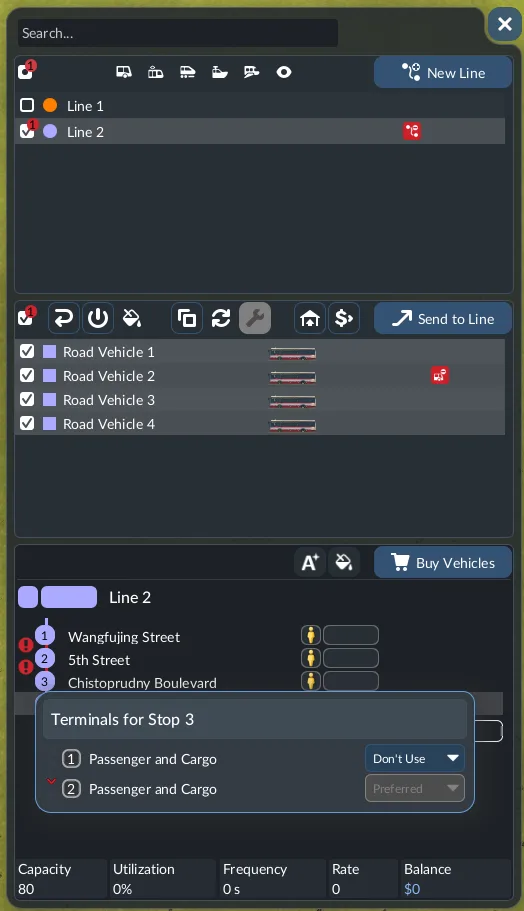
Connection problem indicators reveal when a line cannot reach an assigned terminal.
If the route is invalid, correct that path before adding vehicles. More vehicles sent toward an unreachable or conflicting terminal only enlarge the queue. If all enabled alternatives are reachable but vehicles still wait, observe whether the terminals are already occupied and continue to the loading and departure checks.
Correct Platform Length and Loading Speed
When a train or tram is longer than its platform, loading and unloading are slowed. Transport Fever 3 exposes an appropriate warning in the vehicle window, station window, and Select Terminals dialog. Treat that warning as a direct diagnosis: extend the relevant platform or assign the vehicle to a sufficiently long terminal instead of assuming that another unrelated station module will help.
Platform length must be checked against the vehicles actually using that terminal. A station can contain several platforms yet still bottleneck one line if its assigned platform is too short. After changing the platform or assignment, reopen the same windows and confirm that the warning has disappeared.
Loading speed also varies by cargo type and is displayed as a percentage in the vehicle window. Hover the cargo's loading-status row to see a more detailed breakdown of its loading speed and modifiers. The loading HUD indicator shows whether handling is occurring at a normal, increased, or decreased rate.
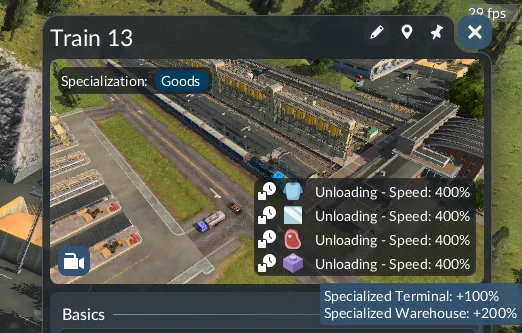
Read the unloading modifiers for the cargo being handled to inspect specialization effects.
For cargo service, compare three specializations:
- The vehicle specialization.
- The terminal specialization.
- The warehouse specialization, where applicable.
Matching specializations provide a loading-speed bonus, while mismatches apply a penalty. Some station types offer specialized cargo platforms that improve handling for a specific set of cargo types, but handling for other cargo types drops significantly at that terminal. Do not replace a universal facility merely because a specialized one exists. Choose the specialization that matches the cargo handled at that stop, and read the in-game description before committing to the module.
If a terminal handles several incompatible cargo categories, inspect whether the specialization is helping the dominant task while penalizing another. The correct response may be a better terminal assignment or a separate handling terminal, but the evidence must come from the displayed cargo type, specialization, loading indicator, and speed breakdown. Read the displayed modifier for the affected vehicle instead of assuming the same improvement at every platform.
Remove Unnecessary Departure Waits
A free approach and a correctly sized platform can still appear blocked when the occupying vehicle is intentionally waiting. Open the stop configuration and check the departure mode before changing the station layout.
Transport Fever 3 provides three stay modes:
- Load if available stops the vehicle and loads compatible cargo that is present.
- Full load (any) waits until one cargo type is fully loaded.
- Full load (all) waits until the vehicle is fully loaded.
In the unmodified game, the distinction between any and all applies to trains and ships because they can contain separate compartments or wagons and carry multiple cargo types. Other vehicle types wait for a full load in either full-load mode.
A full-load rule can occupy a terminal when the required cargo is arriving too slowly. That is not a platform-capacity failure. Confirm that the wait is intentional and appropriate for the line's task. If clearing the terminal matters more than waiting for a full load, select the departure behavior that fits that objective. Also inspect cargo-type filters and the configured loading percentage so that the vehicle is not waiting for a condition the stop cannot satisfy promptly.
Additional wait time is another separate setting. It allows a vehicle to remain after loading or unloading so the simulation can distribute vehicles more evenly along the line. That spacing can be useful, but at a constrained terminal it also keeps the platform occupied. Reduce or remove it only when your observation shows that this extra wait is the source of the queue; do not confuse it with slow loading.
After changing a departure setting, watch the same stop again. Verify that vehicles leave when expected and that the change has not merely moved the queue to another terminal or part of the line.
Fix Passenger Crowding Without Confusing It With Throughput
Passenger station capacity depends on available space. Longer platforms can provide more waiting space, and side buildings can add shared capacity used by all platforms. The shared amount appears beside the capacity icon in the Waiting Hall. Each side-building type provides a different amount, so use its in-game description rather than assuming that every building contributes equally.
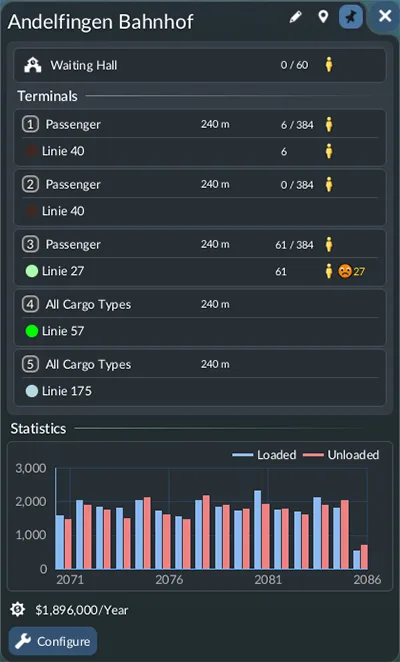
Station Details separates passenger waiting capacity from service-throughput information.
Increasing waiting capacity is appropriate when the station itself is overcrowded and passengers need more room. An overloaded passenger station can operate to a limited extent, but overcrowding makes passengers unhappy faster and negatively affects town growth. If passengers start leaving the station, extra waiting space may prevent immediate overflow while you correct the service problem.
Capacity and service rate are still different. A larger Waiting Hall holds more people; it does not by itself create more departures. If the unhappy-passenger count remains high and the loaded/unloaded graph shows that service is not keeping up, increase the line's rate. Depending on the observed line, that can mean adding vehicles or using vehicles with greater capacity or speed.
Before doing so, make sure the station can receive the additional service. If vehicles already queue outside, adding another vehicle can intensify the existing bottleneck. Resolve terminal reachability, approach conflicts, platform length, and unnecessary occupation time first. Then adjust line capacity only if passenger demand still exceeds what the working station clears.
Reconfigure Only the Module That Solves the Confirmed Problem
Select Configure in the station window to open the modular station builder. Existing stations can be extended or changed with tracks, platforms, buildings, entrances, and other compatible modules. Individual modules have placement restrictions, and some can only be placed above or below other modules. The builder displays individual construction costs while you work.
Choose the modification from the diagnosis:
- Extend a platform when the game reports it is too short for the assigned train or tram.
- Add passenger side-building capacity when the Waiting Hall is the confirmed limit.
- Add or reassign a terminal when simultaneous vehicle use is possible and the approach can reach it.
- Choose a matching specialized cargo platform when the loading-speed breakdown shows a relevant handling mismatch.
- For a road station with an access queue, consider whether an additional vehicle entry or exit on another side creates a usable flow path.
Do not expand every dimension at once. A large station still bottlenecks when its routes converge on the same unusable approach, its platforms are assigned poorly, or vehicles hold terminals under unsuitable departure rules. Multiple simultaneous changes also make it difficult to learn which correction worked.
Be careful with removal. Use the bulldozer from inside station configuration mode when removing an individual module. Bulldozing outside configuration mode removes the whole station. Finish configuration with the control in the bottom menu bar or by pressing Escape as appropriate.
Verify That the Queue Is Actually Gone
Return to the baseline after every change. Watch multiple arrivals under normal operation, not just the first vehicle after construction. The correction is successful when the original constraint no longer appears and the station continues to function through repeated arrivals and departures.